How to assess the quality of garments: A Beginner's Guide {part II}

As promised, here comes part II of the quality beginner's guide: all about assessing seams, linings, tailoring and details like buttons and pockets. If you haven't yet, make sure you also check out part I for some general pointers on assessing garment quality and a run-down of six popular fabrics. I decided to post the cheat sheet (= a summary of the most important points of all two parts of the guide) in a separate post. Click here to view and download it.

3. Seams
The seams of a garment are generally a fail-proof indicator of its quality, because although they are hugely important for the durability and shape of a garment, the average shopper will typically pay little attention to them. That’s why low-budget manufacturers like to save money and time by skipping the extra seam work it takes to turn a garment from something that holds up and looks fine on the rack into a durable garment that will retain its shape and structure over time. Here are a few ways to check the quality of the seams on a garment:
General properties
- First, look over the main seams of the item. Are they straight or crooked? Neat or messy? Stray threads, loose stitches or areas that have been stitched over multiple times are all bad signs. There should also not be any obvious needle holes in the seams. These were likely created by a needle that is too large for the fabric, i.e. a basic manufacturing mistake that weakens the seam over time. To check the strength of the seam, try pulling on the fabric a little on either side. If the seam separates, it was poorly manufactured.
- Next, make sure that all seams on the fabric lie completely flat without puckering. The seams of a garment should never break up its silhouette and should ‘seamlessly’ integrate into the piece.
- If a garment is patterned, check whether the patterns line up at the seams. High-quality brands will make sure a patterned garment looks like it consists of one piece of fabric, low-quality brands will usually skip that extra step to save money.
Type of seam
- Another indicator of quality is the type of seams the manufacturer used to connect the individual pieces of fabric. As a rule of thumb, you want neat, secure, reinforced seams instead of a few flimsy stitches. However, depending on the item and also the role of the seam within the fabric, you’ll need to look out for slightly different things:
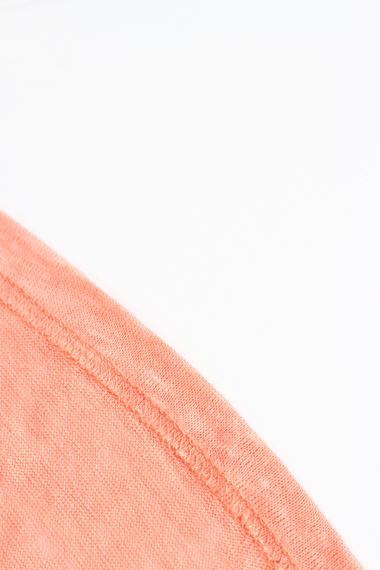
- Start with the inside of the garment: A very common way to sew seams is to serge them. A serged seam has that distinct zig-zag pattern, and is one of the fastest, cheapest ways to seam a garment. Now, even though serged seams are not particularly strong, they are completely fine for finishing edges on garments like t-shirts and lightweight shirts, particularly when the edge is folded under first (like on the top right picture). What they are no good for is load-bearing seams, i.e. any seam that connects two pieces of fabrics, like side seams on trousers, shoulder seams and also the hemlines of items made from heavier fabrics. Because load-bearing seams are under constant tension they should be created using a more secure method, e.g. using double stitches (two rows of stitches close to each other), French seams (the fabric edges of each piece of fabric are folded under and then sewn together) or bound seams (the fabric edges are each folded under and then enclosed in a strip of fabric, like on the top left picture).
- Now, onto the outside of the garment: In general, high-quality manufacturers will want to hide outer seams as much as possible (unless they are a part of the design). Load-bearing seams should all be neat, secure (do the pulling test) and not too noticeable. A stable, secure hemline is also crucial for the shape of a piece, so finish off your seam inspection by checking out the lower edge of the piece. The hemlines of lower quality garments will usually just be folded under and sewn in place. In that case you would be able to clearly see a line of stitches on the outside and serged zig-zag lines on the inside. Like I said above, this type of seam is fine for lightweight items, but for things like jackets, trousers and skirts, that depend on a strong hemline to retain their shape, you are better off with a bound seam (top left image) or an invisible finish (which uses a blind hem stitch to attach the hemline to the garment and is barely visible from the outside).
4. Tailoring
Our bodies are not two-dimensional, that’s why almost every garment needs a little tailoring to make it fit the contours of our shape. To what extent a brand takes the extra time to do this, says a lot about the overall quality of its collection. Now, more than any other point in this guide, tailoring obviously has a strong individual component. Although a number of things are universal (e.g. there should always be a back seam in jackets), a major portion of what ‘good tailoring’ means to you will depend on your body shape. What works for you might not work on your friend and vice versa, so make sure you always assess the tailoring of a garment from both an objective (best practices of tailoring) AND a subjective perspective (whether it suits your body shape). Let’s start with a few objective properties of good tailoring :
- Items like shirts, blouses, jackets and non-stretchy dresses and tops should have darts on the front and under the bust to pull in the bottom of the item to your waist and make sure the fabric underneath the bustline does not bulge or hang.
- The seams on the shoulders of jackets and tailored tops should be reinforced to prevent them from becoming stretched out over time.
- Something that many budget manufacturers skip is a seam down the center of the back. Your back is not flat, which is why a square piece of fabric will never look as good as a piece with at least one if not multiple back seams that follow the curve of your back. Stretchy tops do not necessarily need a back seam, but definitely look for one on jackets and coats.
- Many high-quality shirts and blouses have a shoulder yoke, which is an extra piece of fabric that sits on your shoulders and around the neckline, connecting the front and back piece of the shirt. A shoulder yoke is not a must, but it does allow for a neater fit around the shoulders and a smoother drape across the front and back.
- Another way cheaper brands save money is by skipping facings and interfacings. An interfacing is an extra piece of fabric sewn in between the outer layer and the lining of a piece to support its structure and keep it from stretching out, for example along the shoulders or button placket. The only way to figure out whether a garment includes an interfacing is to feel it with your hands. A facing is a piece of fabric that encloses the raw edges inside a garment opening, e.g. around the waistband, the sleeve opening, the neckline or the collar, to protect the seams and help the garment keep its shape.
- No matter how professionally a piece was tailored, if it does not match the outlines and proportions of your body, it is not a great choice for you. That is why you should always try on an item and move around in it. Raise your arms for example. Neither the shoulders nor the side of the garment should rise as well. If they do, the item was either not well-tailored or does not fit you well. The same goes for skirts and dresses that ride up and tops that leave a pool of fabric above your bustline.


5. Lining
- Any garment with a high-quality lining should get major bonus points! Linings are great for a lot of reasons: they give the garment a neater finish on the inside by hiding (and protecting) seams, interfacings, padding and all that stuff, they add an extra layer of warmth and protect the outer shell from skin oils and sweat, which greatly prolongs the lifespan of the piece. They also allow you to slip more easily into the garment, which reduces the tension on the outer layer and keeps the fabric from becoming baggy/stretched out. For items like fitted skirts, a lining also greatly improves fit because it prevents the outer fabric from clinging to your thighs and thereby creates a more streamlined silhouette.
- Linings are a must for some types of garments, but not all of them. Items that should be lined include anything that is very constructed/tailored, expensive to clean or delicate. Think: lighter, see-through fabrics, jackets, coats, structured dresses, loosely woven fabrics, suedes and leathers as well as knits and tailored skirts.
- Assess the fabric of the lining like you would any other fabric and make sure you like how it feels on your skin. In general, linings should be made from a thicker, sturdier material that is antistatic. Whether you prefer cotton, satin or a wool mix is up to you, but always make sure that the lining has the same care code as the upper fabric, otherwise getting it cleaned is going to be a huge hassle.
6. Details
6.1 Buttons & Zippers
- Check that the buttons are spaced out evenly and secured by multiple threads underneath to keep them in place. There should also be at least one extra button included with every item. High-quality labels will usually attach these to the label or the hemline.
- Even more important than the buttons themselves are the button holes, which should always be reinforced to keep the button from pulling on the fabric unevenly or even ripping through. Ideally, button holes should be bound or reinforced by very densely stitched thread (like in the picture above). You should not be able to see any raw edges of the fabric through the stitching.
- Button holes on jackets and cardigans (or any item that depends on a clean silhouette) should be of the “keyhole” variety, which means that they include a round hole on one side. This allows the button to sit comfortably in the button hole without distorting the fabric.
- Always assess the quality of a garment’s zipper while you are wearing it, that way you will get a better idea of how the zipper holds up under pressure. Make sure it moves smoothly and lies flat against your body, without puckering. The zipper should also completely lock at the top and not move down if you pull on the sides a little bit.
6.2 Pockets
- High quality jackets should have real pockets with an adequate length. On fitted or very tailored pieces pockets may be closed by a line of stitches to keep the silhouette smooth. That way you can decide whether you would like to use them (by opening the stitches) or not. Another thing to look out for when inspecting pockets is whether the opening is reinforced by a line of neat stitches.
6.3 Labels
- In general, brands that care about the comfort of their garments will not use printed, but woven labels, and place them somewhere it won’t feel uncomfortable for the wearer. Avoid anything with a huge obnoxious, plastic label. Even though they can be cut off, it's a huge pain to remove them completely without tearing the fabric or leaving a tiny, but itchy rest.
The entire garment quality series:
- Part I: What is quality + all about fabrics
- Part II: Seams, tailoring, linings & details (this post)
- Part III: Cheat sheet